
Almost every contractor knows that using the correct tools for a job often makes physical work more manageable and improves the overall craft. That said, selecting and using the proper trowel for your next tile installation project is no different; it’s just as important as choosing the correct thinset and grout.
Before learning about various trowels, let’s begin at the base layer: Thinset.
Insufficient thinset coverage can weaken and compromise an entire tile system, ruining your project and costing valuable time and money. No one wants to rip out tiles because of voids or gaps in mortar coverage. Conversely, using an overabundance of thinset results in raking out excess mortar from the joints, making the job messy and yielding less coverage per bag. Additionally, using too much thinset may lead to lippage issues, which you may recall from my previous post.
Knowing the correct type and size of the trowel to use on your next tile installation sets you up for success and an overall less stressful process. This blog post explores why the right tile trowel matters and how it can significantly impact your projects.
Several tile trowels exist-each designed for a specific purpose and installation. It’s important to note that sizes and types of trowels vary depending on the manufacturer and regional preferences. Always refer to installation recommendations for your tile and adhesive to ensure a successful installation. Using the proper notch trowel for the size and shape of the product being installed is extremely important and should not be overlooked. With the variety of trowel products on the market today, the “one-trowel” approach should not be embraced. Each tile is different, so a corresponding trowel should be used. Here are some common types:
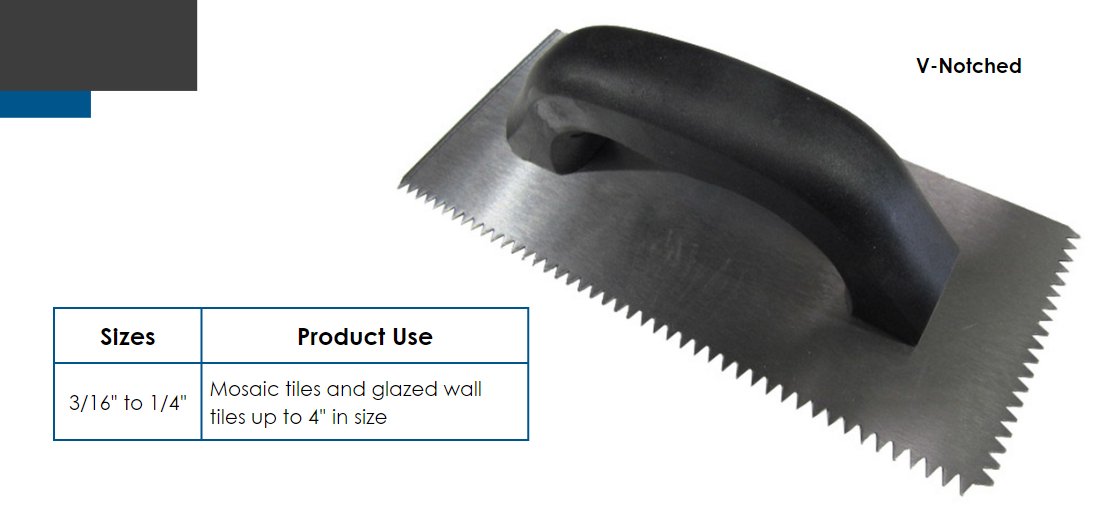
The V-notched trowel has V-shaped notches, which provide better control over adhesive distribution. It is often used for installing smaller mosaic tiles or tiles with thin-set adhesives. V-notches come in different sizes, including 1/8”, 3/16”, or 1/4”, depending on the tile size and substrate conditions.
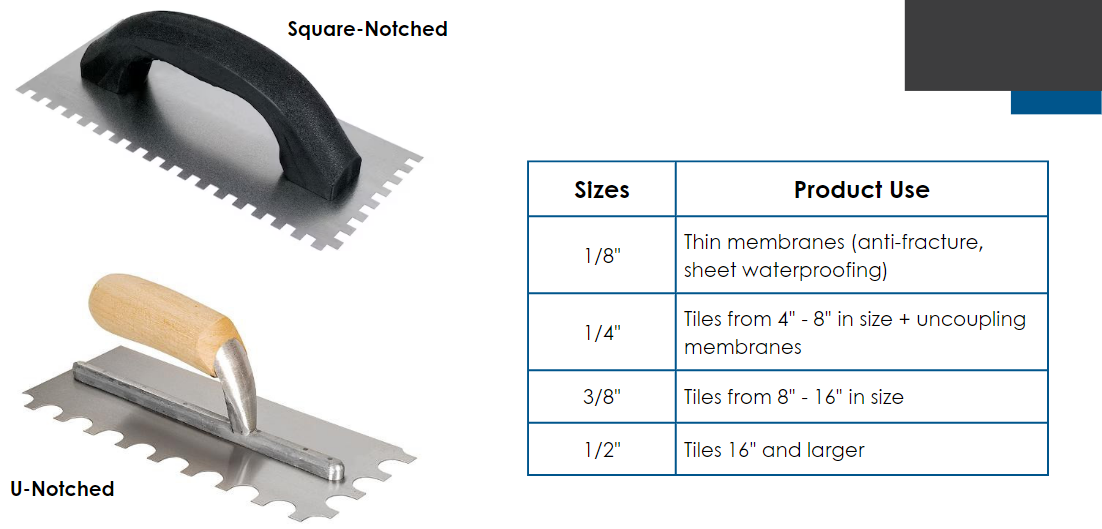
These are the most commonly used trowels for tile installations. They have straight sides and either a square notch, or U-shaped notch. Square notches are typically used for smaller tiles, while U-notches are suitable for larger tiles. The size of the notches vary, ranging from 3/16”to ½”, depending on the tile size and adhesive requirements.
Reading tile trowel notch sizing may initially seem confusing, but it is relatively straightforward once you understand the notation system. Trowel notch sizing is typically represented in fractions or metric measurements, indicating the depth and width of the notches on the trowel.
Fractional trowel notch sizes are represented using measurements such as 1/4″, 3/8″, 1/2″, 3/4″, etc. The first number represents the width of the notch, while the second number represents the depth. For example, a 1/4″ x 1/4″ notch size means that the width and depth of each notch on the trowel are 1/4 of an inch.
Metric trowel notch sizes are expressed in measurements, such as 6 mm, 8 mm, 10 mm, etc. The measurement refers to the width of the notch. For instance, an 8 mm notch size means that the width of each notch on the trowel is 8 millimeters.
Always consult the supplier’s recommendations for the appropriate trowel size for your specific tile installation project.
There is more to trowel design than just material and comfort. Important factors to keep in mind include:
Considering these factors makes choosing the right trowel easier. Select one that provides a comfortable grip, reduces fatigue, offers durability, and enhances overall control during tile installation. Remember to prioritize comfort and choose a trowel that feels right, as it can significantly impact your tiling experience.
Beyond the appropriate trowel selection, other vital factors must be considered throughout the installation process. Every step is crucial, from choosing suitable tiles to preparing the surface. The size, shape, and notch-type of the trowel can significantly affect adhesive coverage and, ultimately, the durability, performance, and aesthetic appeal of the finished tile job.
The tile trowel is often an overlooked aspect of tile installation, but its importance cannot be overstated. The right trowel (size and shape) ensures proper adhesive coverage, facilitates tile placement and alignment, improves efficiency, and enhances the installation’s long-term performance.
Before starting your tile installation project, research your tiles’ specific requirements and consult industry guidelines or professionals. By choosing the appropriate tile trowel, you set yourself up for success, achieving a beautiful and long-lasting tile installation that adds value and aesthetic appeal to your space. Remember, the right tool can make all the difference in tile installation.
To learn even more, check out this video from Schluter.
Have other technical questions? Contact our QA&T team!